WordPress Annoyances

I haven’t been posting as much as I want to lately – I’ve been fiddling with some WordPress issues and a lot of work from my day job.

Here’s some minor thoughts that don’t deserve a post by themselves:

Routing

{
  "code":"rest_no_route",
  "message":"No route was found matching the URL and request method",
  "data": {"status":404}
}

I wrote a custom WP plugin which accepts requests from an App Engine application and returns some custom data. Unfortunately, my app on GAE was returning the above error whenever it tried to make a HTTP request to the WordPress app.

Long story short, the register_rest_route() on my plugin only declared a GET endpoint, and my GAE application was trying to use POST. Make sure you’re using the same HTTP type if you get this error.

WPEngine Firewalls

By default, WPEngine has a firewall that blocks GAE-originated requests from hitting WP plugins – fortunately, if you need GAE to WPEngine-hosted WP communications, you can email WPEngine through their contact form to remove the firewall on a per-blog basis.

Setting Up Sendgrid To Receive Mail

I was setting up a new application to use SendGrid’s inbound parse email function, so here’s some quick documentation. In the Sendgrid dashboard, go under Settings > Inbound Parse:

Sendgrid's settings menu holds the inbound parse option.

Then click on the top blue button: Add host & URL.

Inbound parse screen on Sendgrid. Click the top blue button to continue adding inbound options for your email.

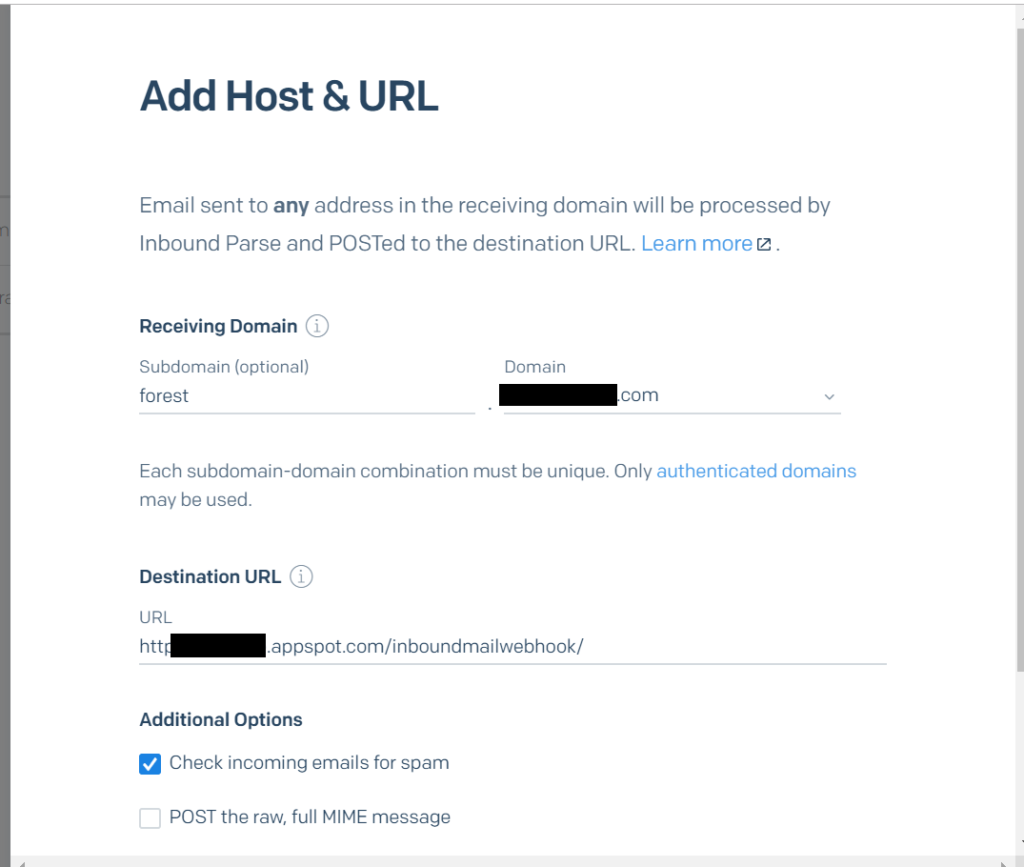
Fill in the screen that comes up with the proper domain, and subdomain (the subdomain is optional). The destination URL is where Sendgrid will POST the email to.

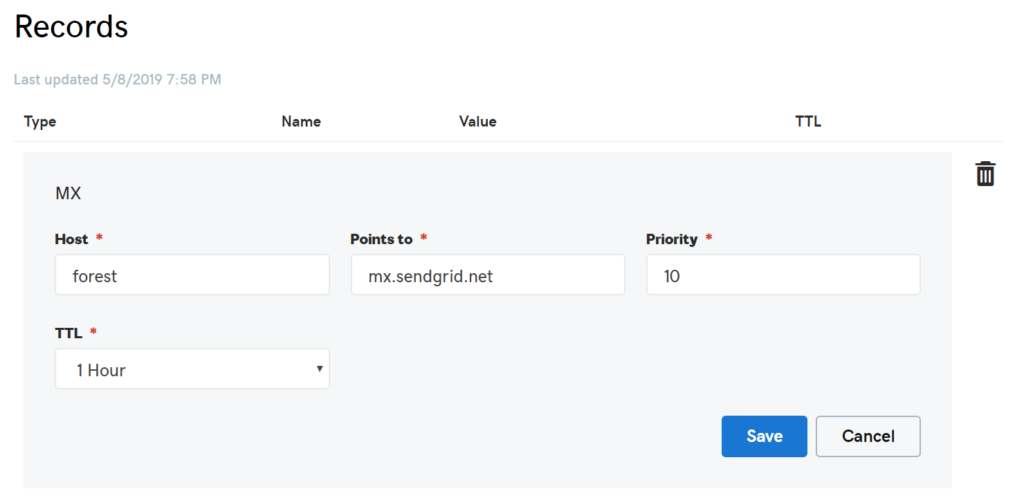
At the domain registrar, set up the proper MX record. Look up the appropriate documentation based on the registrar you use – this is how it looks like on GoDaddy:

Screenshot of the proper MX record on GoDaddy.

In your application, set up a handler to answer the SendGrid request: in the screenshot example above, the handler was located at /inboundmailwebhook/. Any inbound mail gets POSTed as regular form data, which most frameworks can handle automatically.

Tweepy Code Sample: Auth & Iterating Through Following Users

Here’s a short code example using Tweepy to pull a list of following users (users that you follow). consumer_key, consumer_secret, access_token and access_token_secret are necessary tokens for authenticating into Twitter.

auth = tweepy.OAuthHandler(consumer_key, consumer_secret)
auth.set_access_token(access_token, access_token_secret)

api = tweepy.API(auth)

for friend in tweepy.Cursor(api.friends).items(3):
    # Extract friend (following) Twitter screen name and user id
    friend_screen_name = friend.screen_name
    friend_id = friend.id_str
    print("Friend screen name & ID: %s - %s" % (friend_screen_name, friend_id))

Searching The Content Of A Web Page: The intext: and allintext: Search Operators

Among the less useful of operators are the intext: and allintext: search operators. As the title says, these operators require that the given word(s) show up in the content of a web page. For example, if you searched for intext:stock (no space between intext: and the searched keyword), the returned web pages would have the word stock as part of the web page:

intext:stock

Similarly, if you searched for allintext:stock dis, you would get web pages with the words stock and dis within their text content:

allintext:stock dis

While these operators are important to remember, they’re not as useful as their intitle/allintitle/inurl/allinurl counterparts. In the vast majority of cases, skipping the intext: search function and searching on the same key words would result in the same, or largely the same, search results as using the operators.

Delete Old Entities – Java Datastore

This is an ultra-simplified example of how to delete old entities from the App Engine Datastore. The first 3 lines of code retrieves the current date, then subtracts 60 days from the current time (the multiplication converts days to milliseconds). DATE_PROPERTY_ON_ENTITY is the date property on the entity – when first writing the entity to the datastore, add the current date as a property. ENTITY_KIND is the entity kind we’re deleting.

		//Calculate 60 days ago.
		long current_date_long = (new Date()).getTime();
		long past_date_long = current_date_long - (1000 * 60 * 60 * 24 * 60);
		Date past_date = new Date(past_date_long);
		
		DatastoreService datastore = DatastoreServiceFactory.getDatastoreService();
		Query.Filter date_filter = new Query.FilterPredicate("DATE_PROPERTY_ON_ENTITY", Query.FilterOperator.LESS_THAN_OR_EQUAL, past_date);
		Query date_query = new Query("ENTITY_KIND").setFilter(date_filter);
		PreparedQuery date_query_results = datastore.prepare(date_query);
		
		Iterator<Entity> iterate_over_old_entities = date_query_results.asIterator();
		
		while (iterate_over_old_entities.hasNext()) {
			Entity old_entity = iterate_over_old_entities.next();
			
			System.out.println("Deleting: " + old_entity.getProperties());
			
			datastore.delete(old_entity.getKey());
		}

Note that is a simplified function – it’s useful if you have a handful of entities that need deleting, but if you have more than a handful, you should convert to using datastore cursors and paging through entities to delete.

PHP Post To PubSub

Today is a rather large fragment demonstrating how to post to Google PubSub. While there are libraries to handle this, I prefer to understand the low-level process so debugging is easier.

Note that this fragment is designed to run on App Engine, as it relies on the App Identity service to pull the credentials required to publish to PubSub. You only need to set up 3 variables: $message_data, which should be a JSON-encodable object, NAMEOFGOOGLEPROJECT, which is the name of the Google project containing the pubsub funnel you want to publish to, and NAMEOFPUBSUB which is the pubsub funnel name.

It isn’t required, but it is good practice to customize the User-Agent header below. I have it set to Publisher, but a production service should have it set to an appropriate custom name.

use google\appengine\api\app_identity\AppIdentityService;

//Build JSON object to post to Pubsub

$message_data_string = base64_encode(json_encode($message_data));

$single_message_attributes = array ("key" => "iana.org/language_tag",
    "value" => "en",
);

$single_message = array ("attributes" => $single_message_attributes,
    "data" => $message_data_string,
);
$messages = array ("messages" => $single_message);

//Post to Pubsub

$url = 'https://pubsub.googleapis.com/v1/projects/NAMEOFGOOGLEPROJECT/topics/NAMEOFPUBSUB:publish';

$pubsub_data = json_encode($messages);

syslog(LOG_INFO, "Pubsub Message: " . $pubsub_data);

$access_token = AppIdentityService::getAccessToken('https://www.googleapis.com/auth/pubsub');

$headers = "accept: */*\r\n" .
    "Content-Type: text/json\r\n" .
    "User-Agent: Publisher\r\n" .
    "Authorization: OAuth " . $access_token['access_token'] . "\r\n" .
    "Custom-Header-Two: custom-value-2\r\n";

$context = [
    'http' => [
        'method' => 'POST',
        'header' => $headers,
        'content' => $pubsub_data,
    ]
];
$context = stream_context_create($context);
$result = file_get_contents($url, false, $context);

syslog(LOG_INFO, "Returning from PubSub: " . $result);

Serializing A Java Object To Google Cloud Storage – Java

A quick code example today: serializing a Java object to Google Cloud storage. write_object stands for the object being written. This code depends on the App Engine libraries for Java, and the Google Cloud Storage libraries.

	GcsService gcs_service = GcsServiceFactory.createGcsService();
	GcsFilename gcs_filename = new GcsFilename(AppIdentityServiceFactory.getAppIdentityService().getDefaultGcsBucketName(), "subfolder_within_bucket" + "/" + "filename.extension");
	GcsFileOptions gcs_options = GcsFileOptions.getDefaultInstance();
	GcsOutputChannel output = gcs_service.createOrReplace(gcs_filename, gcs_options);
	ObjectOutputStream oos = new ObjectOutputStream(Channels.newOutputStream(output));
	oos.writeObject(write_object);
	oos.flush();
	oos.close();
	output.close();

Listening To Music Offline With Google Drive

Do you need to transfer text/music/pictures from your desktop/laptop PC to your iPhone? Do you need these files available to look/listen to even when your iPhone can’t get a signal?

I frequently need to transfer audio files/music from my laptop and listen to them on my iPhone, even in areas that don’t have cell reception. Fortunately, Google Drive offers the ability to mark files as available offline – to download the files to the iPhone’s local memory so they’re available at all times.

To do this, first use your PC to upload files to Google Drive. Then on the iPhone, open up the Google Drive app, find the audio file, and click on the three period symbol (inside the purple box) below:

Google Drive iOS app. Click on the three dot symbol.

A context menu will pop up below:

Google Drive file context menu.

Use your finger to pull the menu up (towards the top of your phone). You’ll see the full menu. Where it says Available Offline, pull the switch to the right until you see blue.

Use the available offline switch to mark the file as available at all times.

You’re done! A prompt should show up, where Drive acknowledges the offline request:

The notice that pops up when the file will be available offline.

To make sure the file is fully downloaded, leave the Google Drive app open a moment before you close it out.